ThinKnx Cloud
Thinknx Cloud is used for several services in the Thinknx system:

Figure 1: Thinknx Cloud Services
- Modifying and updating the project remotely on server and clients. Using the Thinknx Configurator, the integrator or installer can deploy the modified project to the Cloud. The server will automatically be alerted and will reboot once the new version is downloaded, and all the clients will get a notification that a newer version of the project is available to download on their devices.
- How to enable it?
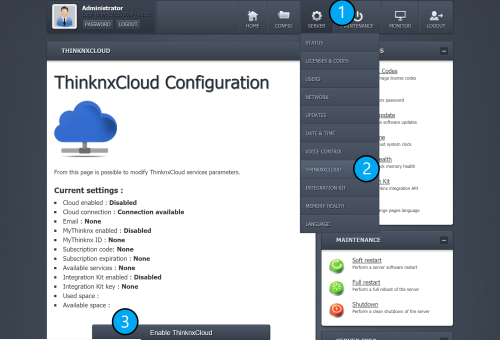
- Step 1. Enable Thinknx Cloud on server. Go to the server's web page, click on Server –> ThinknxCloud, and click on Enable Thinknx Cloud. Enter your email and a new password.
Figure 2: Enable Thinknx Cloud on Server
* Step 2. Enable Thinknx Cloud in Configurator. Inside the Configurator, click on the System tab, then System, and enable Thinknx Cloud in the properties below. Enter the same password used in step 1. Enable Automatic Server Update, Automatic Authentication, and Automatic Connection.
Figure 3: Enable Thinknx Cloud in configurator
- Automatic client connection. In the absence of a fixed external IP address at the automated location, it is possible to use Thinknx Cloud to allow remote access to the project for all clients. They will be able to monitor their entire house from anywhere using only the Internet at no additional cost. However, some services might not be available for this option, such as answering a SIP call remotely or viewing a local IP camera from outside the house.
- How to enable it?
- Follow same steps as previous service.
Database for live data storage. Every project will require to save some data for continuous monitoring, chart visualization, or monthly reporting. This data will be saved for each single server in a dedicated space on the cloud. Every time a Thinknx application is launched, the server will contact the cloud to retrieve this data, and update them as they change. Only a small amount of values is saved locally on the server.- How to enable it?
- This service is available the moment Thinknx Cloud is enabled following the steps in the previous services.
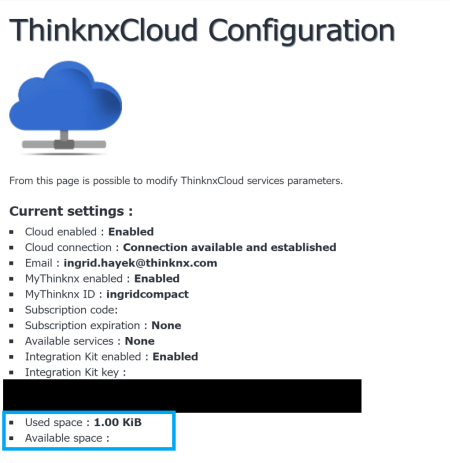
- To view the amount of data used in the project so far, you can go to the server's web page, click on the server tab, then choose Thinknx Cloud. The amount of used data can be read in the status messages.
Figure 4: Used Space on Cloud
If the server was bought without the Report and Gateway license, it is only possible to store 20 MB of data on the Thinknx Cloud. Once the license is purchased, saving data becomes unlimited.
- Dynamic DNS. This option is used in the absence of a fixed external IP address at the automated location. Instead, the public IP address is accessible but changes after each connection renewal or on router reboot. Thinknx offers a free dynamic DNS service configurable from the server’s web page. With this service, a host name (such as myhome.my.thinknx.net) is associated to the public IP address of the router and the server will always be reachable through this host name no matter what the public IP address is.
- How to enable it?
- Step 1. Enable Thinknx Cloud on server. Go to the server's web page, click on Server –> ThinknxCloud, and click on Enable Thinknx Cloud. Enter your email and a new password.
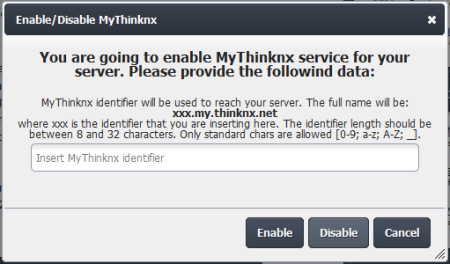
- Step 2. Enable myThinknx ID. Using the same page, click on the button Enable myThinknx, and enter your identifier. MyThinknx identifier will be used to reach your server. The full name will be: identifier.my.thinknx.net.
Figure 5: Enable myThinknx ID
* Step 3. Configure external IP address. Inside the Configurator, go to the system tab, click on System, and go to the External IP Address property. Write down the following “identifier.my.thinknx.net”, replacing the identifier with the myThinknx ID configured in step 2.
* Step 4. Port forwarding on router. To enable client applications to open remotely, a configuration should be done on the router installed in the same network as the Thinknx server. The client connection requirements are managed through the port configured within the configurator. This means it will be necessary to set up port forwarding on the router for the chosen port (default is 7550)


