Table of Contents
Thinknx Quick Guide
Step 1. Downloading The Software
Step 2. Choosing The Right Thinknx Server
Step 4. Creating The First Project
Step 6. Authenticating Clients
Step 1. Downloading The Software
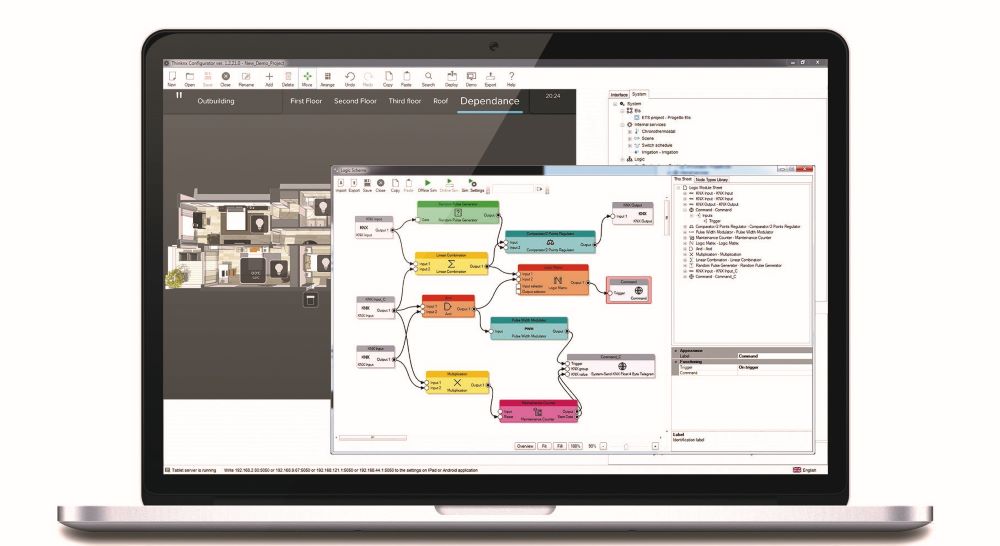
Figure 1.1: Thinknx Configurator
ThinKnx UP Configurator software is the indispensable tool for the creation and development of a supervision project. It is a complete solution to designing attractive graphical user interfaces, determining clients behavior and configuring functions and services. The software can be downloaded here.
System requirements for Thinknx UP Configurator:
- Microsoft Windows 7 or above
- 64-bit system
- Updated graphic card driver supporting DirectX 10
For project visualization, Thinknx UP Client is also available for download:
- Apple - Download App
- Android - Download App
- Windows - Download Player
- Mac - Download Player
ThinKnx Player for Mac is an Air application, thus to be installed on Mac computers it requires Adobe Air software installed. Adobe Air sotfware can be found at https://get.adobe.com/air/.
Step 2. Choosing The Right Thinknx Server
Thinknx provides different types of product divided into two major lines:
- Pro Line a professional range of servers able to interact with complex systems and communicate with multiple protocols: * Micro_20 / Micro DIN
- Compact_20 / Compact DIN
- Rack
- Envision_20 Touch Screen (7“, 7” Retrofit, 10“)
- Envision_20 Client Touch Screen (7”, 7“ Retrofit, 10”)
- Trend Line an affordable solution tailored for simpler plants purely based on KNX, and has limited functionalities in terms of integration with other systems:
- K
- K2
- Piccolo
- Brickbox
- Universal Modular KNX Gateway
Thinknx Multiroom Audio System- Audiofy P1
- Audiofy P4
- Audiofy expansion E4
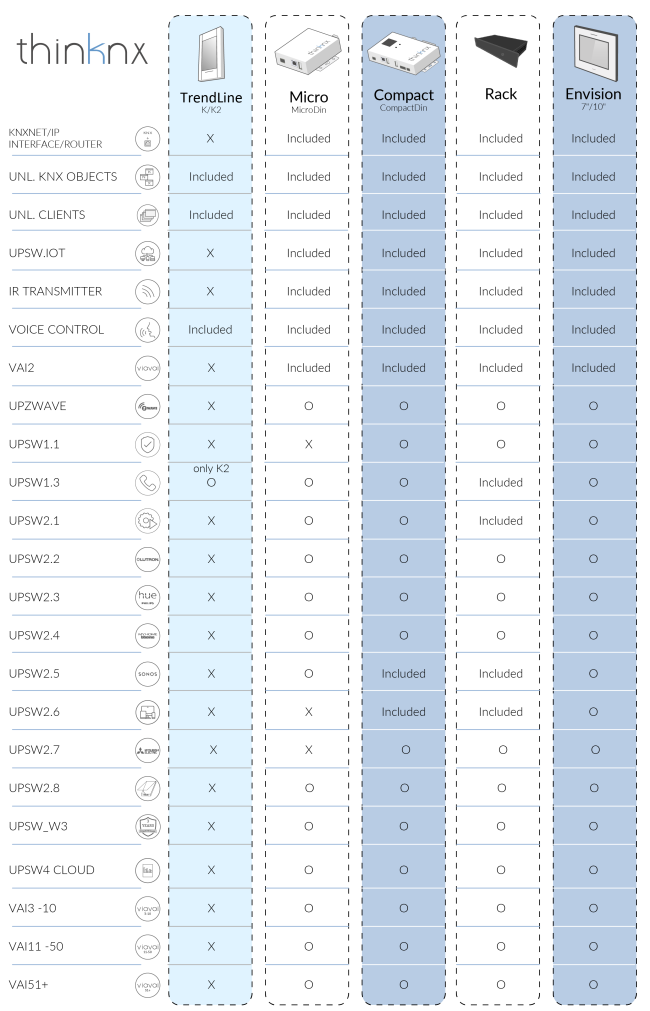
Choosing the suitable server for any project is directly linked to the type of system that needs to be integrated with Thinknx (For example, a Micro Server cannot be used for an integration with an alarm system or Modbus).Therefore, it is always recommended to consult the licensing table below prior making any Thinknx purchase.Figure 2.2: Thinknx Servers Licensing Table
Step 3. Setting Up The Server
Step 3.1. Connect Server to Network and Power
For an easy setup, connect the server to a network that has DHCP enabled. Connect the server to the power, making sure to respect the correct voltage needed for each server type.When installing Envision, we usually suggest to mount the power supply behind the screen to keep the cable as short as possible.
If you want to install DIN rail power supplies with your Thinknx servers, we recommend to avoid routing the cables together with other noisy cables and to tune the power supply's output by raising the voltage at maximum, to compensate the voltage drops over the cables.
Step 3.2. Scan for Available Servers
Once server is powered up, connect PC to the same network and access the scanning tool directly from Configurator. This tool will show all the Thinknx servers detected on the LAN and their corresponding IP addresses.
Always make sure that no firewall or antivirus are preventing the Configurator from scanning the network.
In case the Configurator tool fails, you can always scan for the available servers by inputting the following path on your internet browser: https://www.thinknx.com/api/myIPs.php
Figure 3.2: Server Scanning
Step 3.3. Access Web Interface
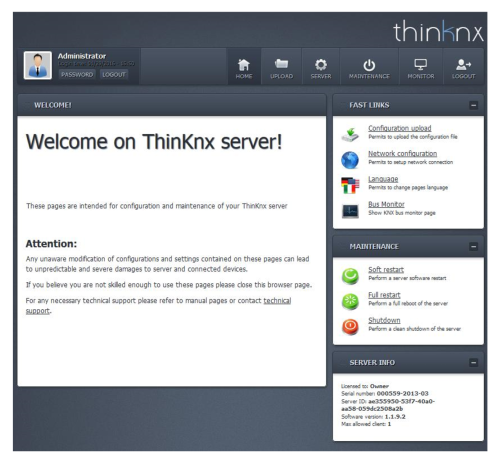
Access to web interface can be done by clicking on the “Open Server Webpages” in the scanner tool, or by inputting the following path into the web browser: http://[server_IP_address]:5051
At the login page, the following credentials must be used: username=service , password=password . It will then be requested to change the password for the next access.
Figure 3.3: Thinknx Web Interface
Step 3.4. Update Firmware to Latest Version
If the server is already connected to the Internet, it is always advised to update the firmware to the latest version in order to avoid system bugs.
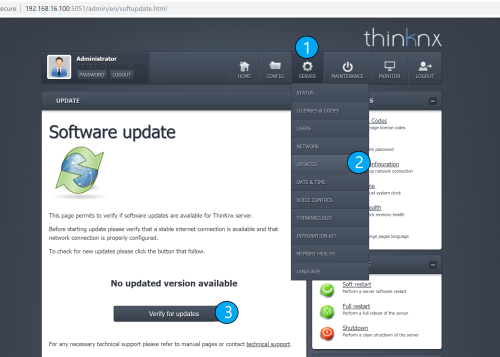
To do that, go to the “Server” Tab, select “Updates” from the list, and click on the button “Verify for updates”. If a newer version is found, click to download and install. Once finished, the server will reboot automatically.
Figure 3.4: Server Update
Step 3.5. Fix Date and Time
Having the correct date and time configured in the server is crucial in order not to mess the switching schedules programmed in the Thinknx application.
To change Date and Time, go to “Server” tab, select “Date and Time” from the list, choose the right time zone, and click on “Save Changes”. Wait for the “Operation Completed” message before going to the next step.
Figure 3.5: Date and Time Configuration
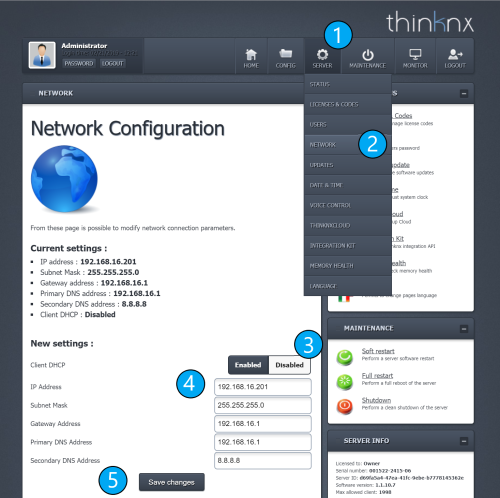
Step 3.6. Configure IP Address
All Thinknx Servers are, by default, configured to use DHCP if the network will allow it. In the absence of a DHCP service, it will acquire the following default IP address: 192.168.0.200.
However, it is advised to always switch from DHCP to a fixed IP address which will allow the user to know the server IP address at any moment disregarding the settings of the network it is connected to.
To enter a fixed IP address into the server, click on the “Server” tab, select “Network” from the list, disable “DHCP” option, enter the IP address manually along with the subnet mask, default gateway and DNS server, and click on “Save Changes”.
To access the server's web interface again, enter the new fixed IP address in the following path: http://new_ip_address:5051.
Whenever a fixed IP is used, the network interface of the server will be configured in such a way so that it will always be reachable at the IP address 192.168.24.254/30.
Figure 3.6: IP Address Configuration
Step 4. Creating The First Project
Projects can be created using a dedicated wizard tool, which will be automatically launched by clicking on the “New” button.
The data required by the wizard tool is:- Project name
- Server type and serial number
- Server IP address
- Geo-localization coordinates (optional)
- List of users (optional)
- Licenses (optional)
Figure 4.1: New Project Wizard
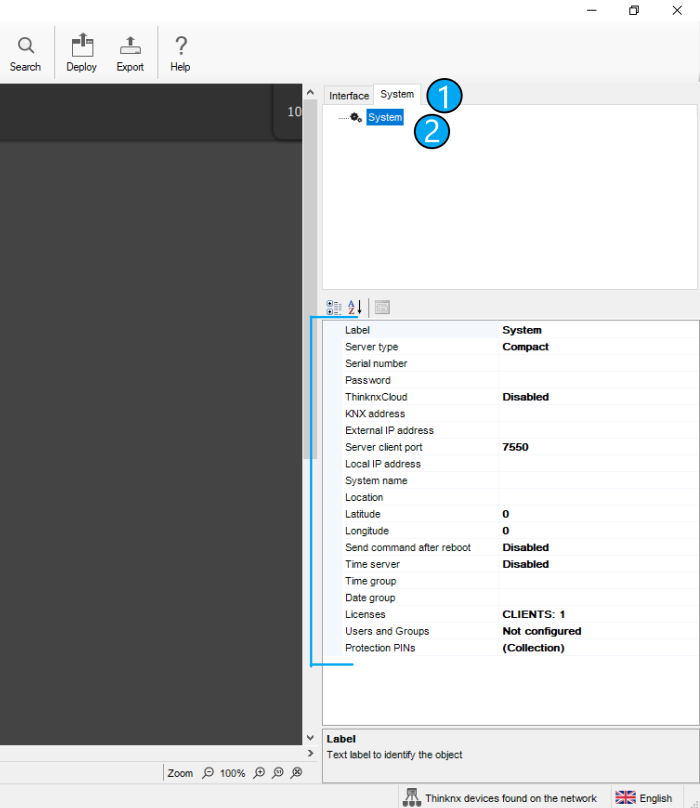
If the data is unknown when creating a new project, clicking END after naming the project will close the wizard and create the project. The missing data can be entered later by going to the System tab, and clicking on System in the list, as seen in the below picture.
Figure 4.2: Project System Information
For more information regarding the Project Creation Wizard, check out our Project Creation page.
Once the project is created, it is now possible to start designing the interface. The integrator will be able to do the following:- Enabling/Disabling functions (located in a menu to the left)
- Creating new pages under each function
- Adding different interface elements for each page (buttons, pictures, indicators, etc). For more information regarding each interface object, check out our Interface Objects page.
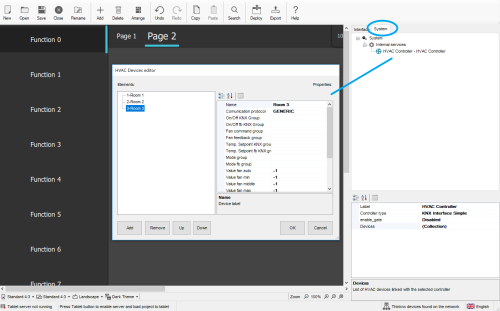
- Creating system objects to be linked to their corresponding elements in the interface (HVAC controller, RGB controller, etc). For more information regarding each System object, check out our System Objects page.
It is always recommended to save the project inside the Configurator, and to create a backup of the file by clicking on Export → Export Project.
Figure 4.5: Saving and Exporting Project
Step 5. Deploying The Project
A Thinknx project can be defined as a folder containing all the configuration files and all the settings related to a specific plant. All files imported in the project (such as ETS, images, etc.) are copied and stored in the project folder.
More information can be found on our Project Deployment page.
When a project's configuration is finished or has been modified, it needs to be deployed to the server and client, using one of these following methods:
Deploying the project should be done to Thinknx server AND client together, after each modification. If the project version on the server does not match the version on the client, the application will not work correctly.
Method 1: Using the local network
This method should be used when the Thinknx server is connected to a local network but has no access to the Internet. However, it requires the use of a PC with the Thinknx Configurator installed as well as the availability of all the client devices on site. The PC and the clients should be connected to the same network as the Thinknx server.
- Step 1.1: Deploying the project to the server After saving the project inside the Configurator, click on “Deploy”, and select “Upload to local server”. After the upload is completed, the server will reboot.
Figure 5.1.1: Deploying to Local Server
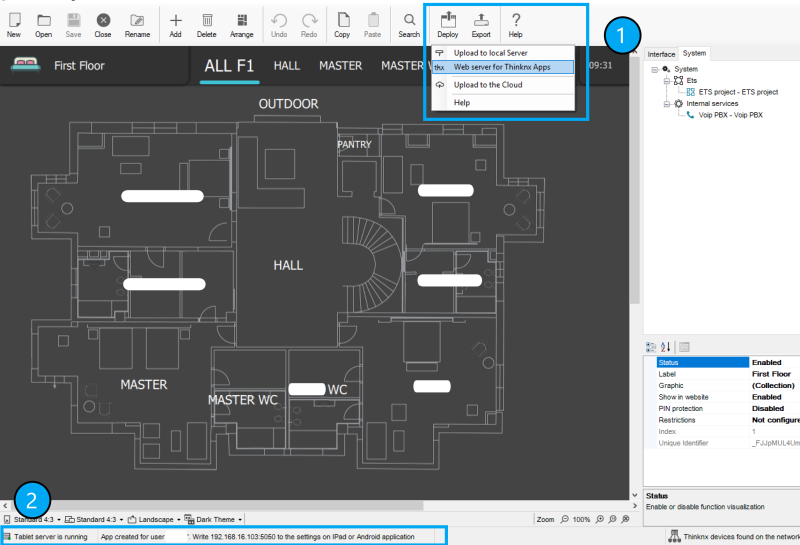
- Step 1.2: Deploying the project to the client After deploying the project to the local server, you will automatically be asked if you wish to do the same for the client. If the automatic request does not show, you can click on “Deploy” and select “Web server for Thinknx apps”. In case some users have been created inside the Configurator, select the user corresponding to the client device. A message at the bottom of the Configurator will show stating that:
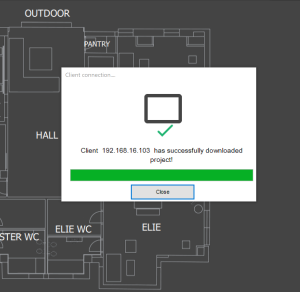
“Tablet server is running. App created for user ”[username]“. Write [PC_IP_address]:5050 to the settings on iPad or Android application”. On the client device, Go to “Settings”, select the tab with a PC icon related to the Configurator, write down in the Configurator URL the IP_address:5050 mentioned in the previous step and click “Download”. The project will be downloaded to the client's device and the progress will show on the Configurator.
Figure 5.1.2.1: Deploying to Local Client
Method 2: Using Thinknx Cloud
This method is more popular than the previous one because it allows to deploy the project to the server and clients even remotely. The main condition to achieve this is to have the Thinknx server connected to the Internet.
- Step 1: Enabling Thinknx Cloud on the server
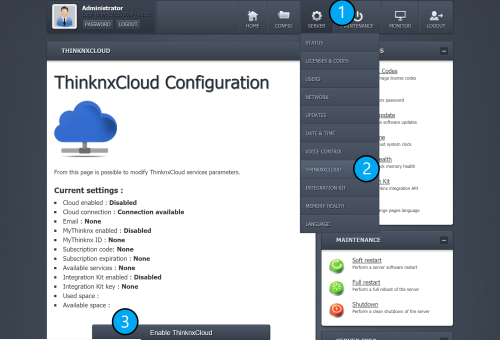
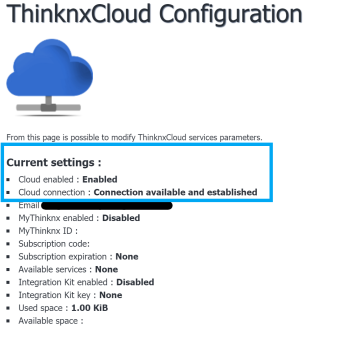
In the web interface of the Thinknx server, click on “Server” tab, select “Thinknx Cloud” from the list, and click on “Enable Thinknx Cloud”. Fill in the new password and email address and click “Enable”. The Cloud service should now be enabled, and the connection should be “available and established” as seen in the picture below.
- Step 2: Configuring Cloud inside the Configurator
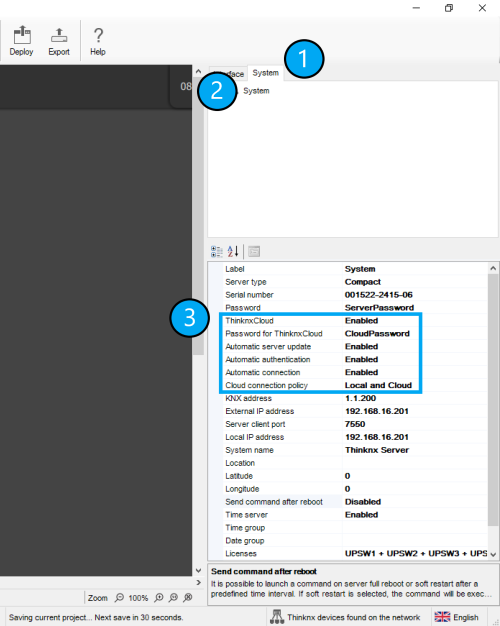
Open project inside Thinknx Configurator and enable Thinknx Cloud in the “System” tab. Make sure to enter the same password used in the web page.
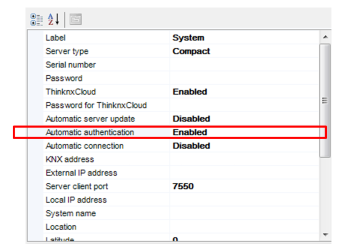
It is also important to enable “Automatic Server update” allowing the server to be updated automatically with every project upload to the Cloud.
Enabling “Automatic Authentication” will allow new users to access the mobile application without the need for an intervention on site (see section Client Authentication below).
Finally, selecting “Local and Cloud” for the “Cloud Connection Policy”, will allow the client to connect to the server using Thinknx Cloud whenever the local connection fails.
Figure 5.2.2.1: Configuring Cloud inside Configurator
- Step 3: Uploading the file to the Cloud
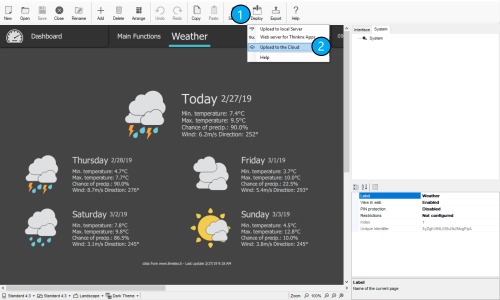
Inside Thinknx Configurator, click on “Deploy” and select “Upload to the Cloud”. Allow 1-2 min after upload for the server to reboot.
Figure 5.2.3.1: Upload to Cloud
- Step 4: Downloading the project onto the client device
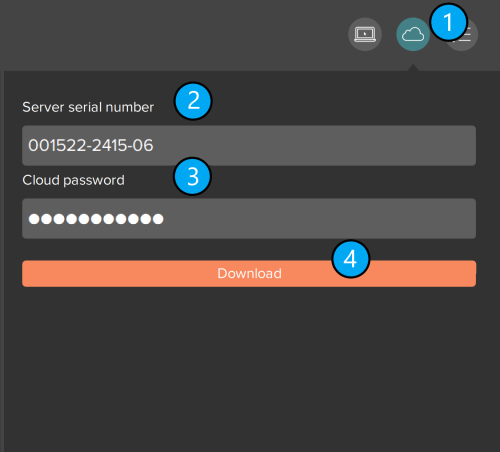
Open Thinknx application and go to Settings. Select the Cloud icon, and enter the serial number of the server and its corresponding password (Cloud password).
If users have been created inside Configurator, then the password entered should be the password for each user.
Figure 5.2.4.1: Downloading project from Cloud
Step 6. Authenticating Clients
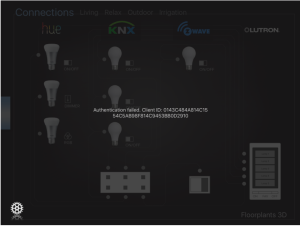
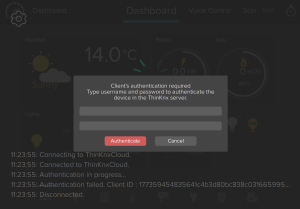
Whenever the client uses the Thinknx application, a connection to the server is established. The first time the client opens the loaded project, the server requests an authentication of the device.
- Authentication via local network:
This method only works if there is direct access to the server's web page.
- The Client Authentication is done on the server’s web page, under Server → Licenses & Codes. * * * * Copy the last connected client code and paste it in the field under the table. Click on “Add client code” and check the “Enabled” box.
- Authentication via Cloud
The authentication can be done remotely without the need to access the server's web page. It only requires the creation of the users inside the Configurator project. The username and password of each user shall be used to allow access to the project. Another requirement is to have «Thinknx Cloud» enabled, as well as «Automatic Authentication» inside Configurator.
